
2 Ways to Reinforce Your Miter Joint in 10 Easy Steps
The miter joint is a strong and versatile wood joinery method that can be used to create boxes, frames, shelves, cabinets, furniture, and much more. But its versatility comes with a drawback: the joint’s strength relies on the wood fibers adhering to each other end-to-end. This leaves the joint susceptible to splitting when there’s any sort of shock or bending force. An easy solution is to reinforce your miter joint using dowels and decorative plugs.
This is not to say a miter joint will have no strength. A tight, liberally glued, and tightly clamped miter will have decent strength. But if you want to add some mechanical insurance, consider one of these 2 methods.
On several projects I have simply used dowels to add strength to my miter joints. See link for a complete floating frame build. Check Price
If you want to reinforce your miter joint using dowels and square plugs, my method for doing this is simple.
Tool Recommendations
It’s important to use quality and precision tools. This includes for measuring and marking, layout, machining and finishing.
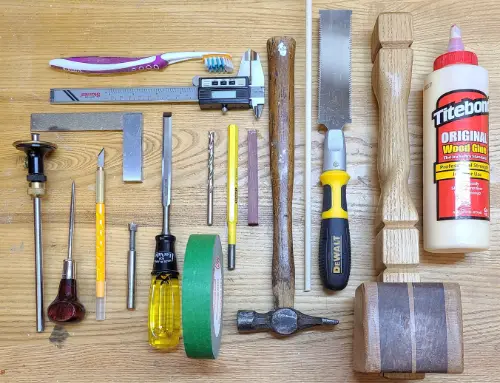
The Basic Tools Needed to Complete this Technique
This technique can be accomplished with a basic set of tools, including. I have included a complete list along with Amazon links to the same or comparable tools that I use.
Tools:
- Marking Gage Check Price
- Awl or center punch Check Price
- Sharp Marking Knife Check Price
- Small Square
- Forstner or Brad Point Bits Check Price
- Sharp Chisel (sized to square plug width)
- Pin punch (to set dowels flush)
- Hammer/Mallet
- Flush Cut Saw Check Price
- Glue, dowel, tape as required
Method 1: Reinforce with Dowels Only
On several projects I have simply used dowels to add strength to my miter joints. My method for doing this is simple:
- construct your frame/case as normal, using miter joints where appropriate for the design and construction of the piece.
- Ensure a tight fitting miter, use a generous amount of glue to compensate for the high absorption rate of end grain, and clamp your joint tightly for several hours (2-3 minimum).
- determine which joints need reinforcement due to load/strain on the assembly. This often will result from racking, load bearing, or forces of use, such as opening drawers and doors.
- Determine the appropriate size of dowel for the joint. In the case of 3/4″ material thickness I would typically use no greater than 3/8″ dowel.
- 1/2″ dowel could be use but you must be precise in your layout and drilling, or you risk blowing out the side of the case piece.
- Also, during insertion of the dowels the is a risk of developing hydraulic pressure in the hole, causing the case piece to blow out.
- Layout the number and position of the dowels. You can use as many or as few as you like, depending on what will fit the geometry of your piece.
- On a 2″ wide frame I generally use 2 5/16″ or 2 3/8″ dowels.
- Using 3 x 1/4″ dowels add a more delicate appearance.
- Use precise measuring and marking tools to layout dowels directly on the center line of the interfacing piece.

- Laying Out the Dowel Positions
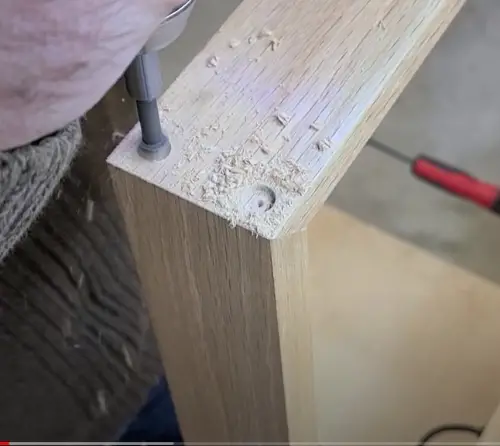
- After layout and marking, using a forstner or brad point drill bit to create a clean hole for the dowel. I generally drill to a depth of about 1.5X the thickness of the material. For 3/4″, drill at least 1-1/8″ deep.
-
Use a Forstner or brad point bit for a clean hole.
-
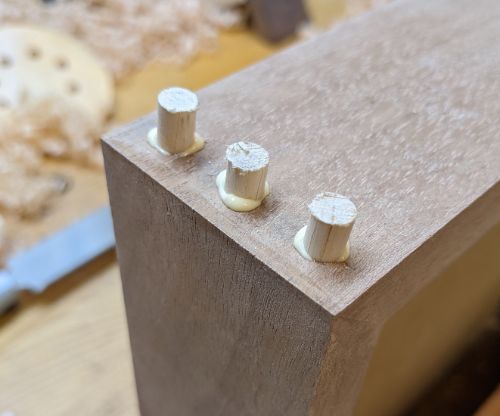
- Cut dowels to ~1/2 longer than the drilled hole.
- Apply glue sparingly to both the hole and the surface of the dowel.
- Most of the glue on the dowel will get scraped off the dowel when you insert it, and you want to avoid building up hydraulic pressure by having too much glue in the hole. By applying a small amount to each surface it ensures some glue remain on in the joint after assembly.
- Insert the dowels using a small mallet until they bottom out in the hole.
-
-
- I like to remove excess glue around the hole with a slightly wetted toothbrush. This reduced clean up later.
Dowel Reinforced Miter Joint – Dowels Installed
-
- You can then use a flush cut saw to trim the protruding ends of the dowels.
- At this point, give the glue a couple hours minimum to dry and then proceed with your desired finishing method (including cleaning up the end of the dowels and surrounding area with a block plane and/or sand paper.

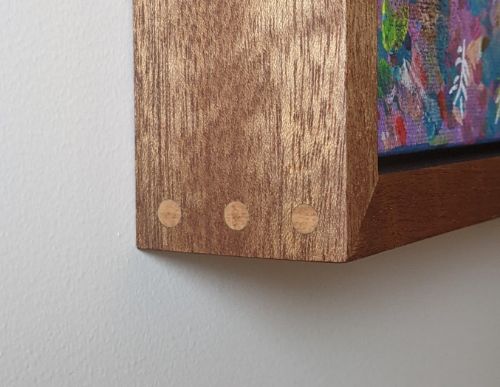
Finished Joint – Dowels Only
Method 2: Reinforce with Dowels & Decorative Plugs
Dowels alone can be very attractive, and are in fact the stronger of these two methods. But if you want to reinforce your miter joint using dowels AND square plugs try the following method.
This method follows the same approach for installing the dowels as the previous method, but the initial holes for the square plugs should be created first. I will describe that method here:
-
- Layout your dowel locations, as above.
- The square plugs should ideally be slightly larger than the dowels, although they could be size the same. It is somewhat of an aesthetic decision.
- Size the square plugs to a standard Chisel size (1/4″, 3/8″, 1/2″ etc.).
- This technique uses the drilled hole to guide the size of the plug, using a standard chisel width to mark the edges of the square hole.
- Use a forstner or brad point bit to remove the center section of the square hole. The hole only needs to be about 1/8″ deep.
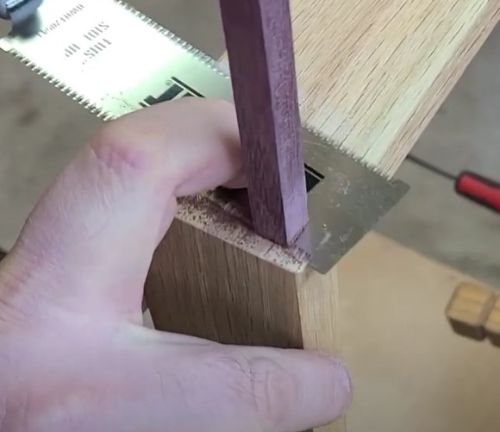
- Use a square and sharp marking gauge to mark out the edges of the square, using the edges of the hole as a guide.
- Locate your chisel in the scored layout lines and create a deeper line to chisel down to the desired depth.
- Chose your plug material to complement the design. Use the table saw to size it just slightly oversize to the square hole (~1/64″ oversized). Create a square section of sufficient length for all of the plugs in the piece.
- Using a block plane or sanding block, slightly taper the end of the square stock to fit tightly in the square hole.
- Apply glue to both surfaces sparingly and insert the square stock using a small mallet.
- Use the same method as above to clean up the excess glue and trim the excess length. Finish as desired.
Trim the excess length with a flush cut saw
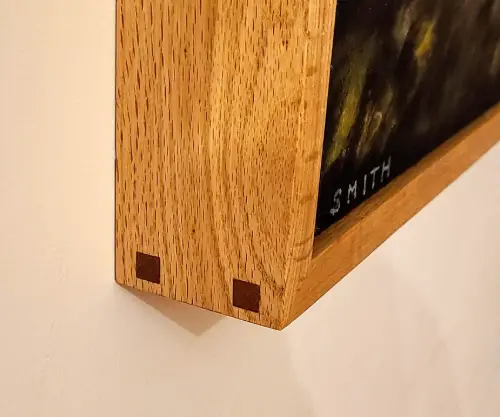
Finished Joint
Check out the video below where I demonstrate the method to reinforce your miter joint from start to finish. LINK
As an Amazon Associate I earn from qualifying purchases. Thanks for your support!