
Makita Track Saw Review
Why Buy a Track Saw at All?
Are you in the market for a track saw? Maybe you’re trying to decide between a table saw or track saw (If you are, Check out this article – Track Saw vs Table Saw).
I can’t tell you the number of comments I’ve read in researching track saws that said ‘You don’t need a track saw, just make a plywood guide for your circular saw…’ – I can guarantee that none of those people have experienced the difference, and believe me, I used a circular saw with a home made guide for years (decades?) and never experienced this level of cut quality and precision.
A track saw can be a great addition to your shop or your job site. It adds versatility and allows a single person to accurately break down sheet goods and make precision, cabinet-quality cuts. It also allows you to take the saw to the work. Think of trimming a large tabletop or counter top; it can be impractical to take the work to the saw.
I’ll tell you why you need a track saw, why the Makita SP6000 is a great option, and I’ll get you started on using it.

Makita SP6000 Plunge Cut Track Saw
Beyond all the different track saw manufacturers to chose from, there is also the decision of corded vs. Battery powered. In this review I am covering the Makita SP6000 Track Saw (Plunge Cut) – the corded version. The cordless equivalent is the Makita DSP601ZJ. These two saws are similar in features and quality. The cordless version uses two 18V batteries in series, for 36V. It is a more powerful saw, assuming your batteries are fully charged.
The cost is also higher when you factor in batteries and a charger. Ultimately the decision to go corded or cordless is personal. It depends on your intended use (site vs. shop), your work-flow, and if you are already on the Makita battery platform to avoid some of the initial expense.
READ: Learn about some track saw alternatives here
Why I chose Corded vs. Cordless
- I am not already on the Makita cordless platform.
- My shop has power readily available.
- I’m already tethered with the dust collection hose so an extra cord wouldn’t be that big of an inconvenience.
After owning the SP6000 Makita saw for a couple years now I would say that decision was the right one. I do find that the dust hose is more of a nuisance than the power cord. On a related note, some people have complained that the 8ft cord is too short, but since I have a retractable power cord at the center of the ceiling in my shop I don’t find that to be an issue at all. So let’s get into it.
Makita SP6000 Plunge Cut Track Saw
Quality
Initial quality on the Makita Track Saw itself is very good. The fit and finish impressed me. At first glance, the base plate, blade housing and motor mount seem to be made of a grey plastic, but in fact they are made from magnesium. Magnesium is a strong and very light weight metal, (most famously used in racing car wheels – everyone knows the term mags.) It has a high strength to weight ratio. It is certainly not as tough as steel, but it’s lighter and stronger than aluminum alloy.
The motor cover and handle are made from durable plastic (Makita teal). The adjustment knobs and depth scale are also made from a similar plastic. I wouldn’t throw this saw down a flight of stairs, but it will certainly withstand years of medium duty use.
Rubberized and Insulated Handle
Adjustment and Settings
The adjustments and plunge action are very smooth. The knobs are easily persuaded, and the pivots move easily. With the exception of the 90° stop adjustment set screws, all the fasteners are Phillips head screws and are easily accessible. The 90° stop adjustment set screws are internal hex socket (Allen head) and are located on the bottom of the base plate. These were precisely set out of the box and should not have to be adjusted with any regularity. Having said that, it is always recommended to check your saw for square. Speaking from experience, finding out the saw was not set square as you are in the middle of a big glue up is extremely disappointing…
The corded model is equipped with a good quality cord – if not long enough for some folks. The plug is well designed with a built-in strain relief and a raised rib feature for pulling the plug from the socket.
Ergonomics
I am left handed so I struggle with the ergonomics of some tools. Either I’m reaching across my body, or the switch is on the opposite side of the tool, etc… I am not completely useless with my right hand however, and that is where a track saw really helps us lefties. Because it is so smooth and well guided on the track, it is quite easy for me to operate this saw with my right hand. I would feel less comfortable using a circular saw with my right hand. Although the manual recommends using two hands while using this saw, it is sometimes inconvenient to do so.
The saw moves smoothly and predictably along the track. There is an adjustment to take up the play of the track guide width, and if this is set properly the saw moves well. The plunge action is also very smooth with just the right amount of spring force to allow precise control of the plunge action.
Handling
The handles are both rubberized which makes them feel very secure and comfortable. The rubberized grips also act as electrical insulation in case the blade contacts a live wire. The weight is substantial at 9.7lbs but its not really an issue since it is well supported by the track. One minor issue with the weight is when bevel cutting. The center of gravity moves out beyond the edge of the track and you need to be more careful to ensure the saw doesn’t tilt further than desired. The base plate has a small tab that slides out to ensure the saw won’t tilt off the track, but you don’t want to rely on this feature alone.
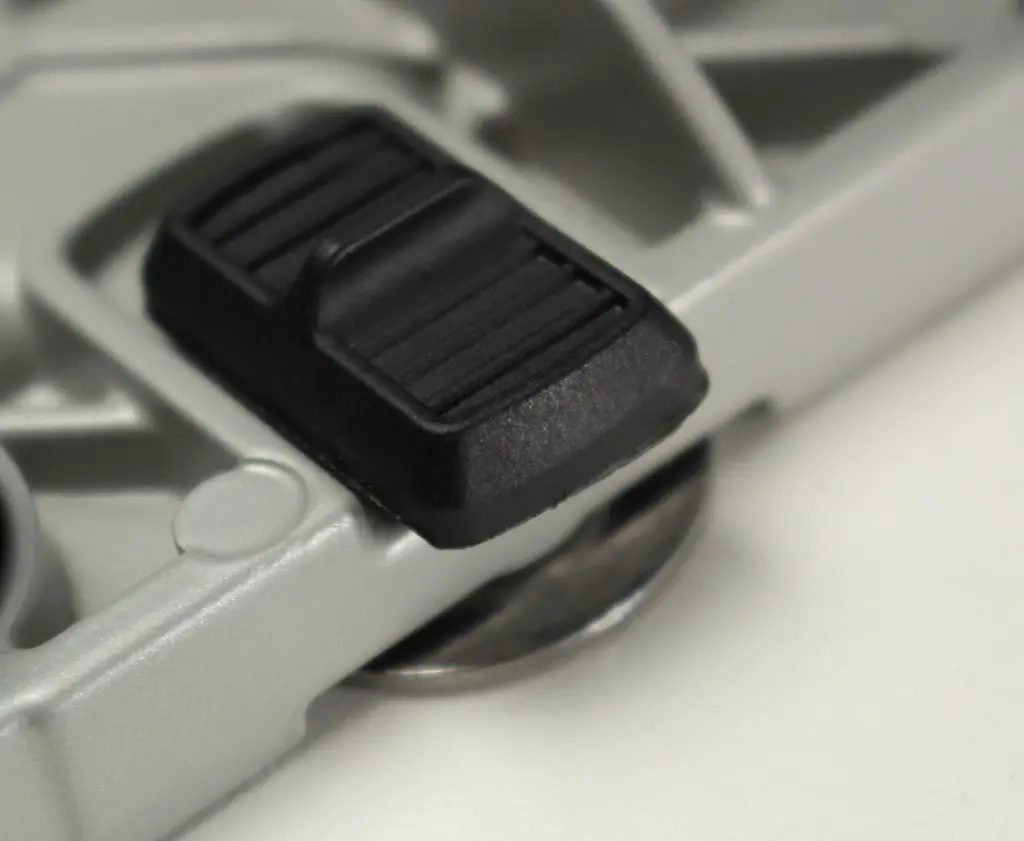
Bevel Tilt Track Catch
Usability
How is the Makita SP6000 to adjust, use and service?
Adjustments
Depth Adjustment
The depth stop adjustment is done using a single thumbscrew knob and a metric scale. The saw is capable of 2-3/16″ (56mm) at 90° and 1-9/16″ (40mm) at 45°. The adjustment is easy and relatively precise, however due to the shape and orientation of the pointer I would recommend double checking depth if the depth accuracy is critical for the cut (say cutting a slot or dado).
There is a feature incorporated into the depth scale to lock the blade at the correct depth to access the arbor screw for blade replacement. There is also a separate knob used to stop the blade at 2-3mm depth for making a scoring cut. This will improve cut quality, mostly on the off-cut side, and especially on chip-prone materials (like melamine). This assumes the saw is being used on the track (as it should be for a cut where you are looking for especially high cut quality). If the saw was not on the track then the score cut would be too deep to be effective.
Cut Length Indicator
Along the base of the saw you will find two small marks near the front and real of the blade. These marks indicate where the blade will cut to at full depth. Marks ‘A’ for a 160mm diameter blade, and marks ‘B’ for a 165mm diameter blade. This is useful if you are plunge cutting, or making a stopped cut.
Cut Length Indicator Marks
There are also two marks at the front edge of the saw base that indicate the outside edge of the blade for when you are not using the saw on a track. When using a track the saw edge will be at the same position regardless of the bevel angle.
Blade Edge Indicator Marks
Bevel Setting
The Makita Track Saw comes well tuned out of the box. I found both the 90° and the 45° bevel stops to be set precisely out of the box. There are two knobs to loosen, one at the front and one at the rear. The knob at the rear of the saw is a bit tight to the base plate which makes it a little hard to loosen if it happens to be a bit tight. The Bevel scale has stops at 0°, 22.5° and 45° degrees.
There is an override lever to extend the bevel to 48°. It is a simple rubberized level that slides up to extend the bevel to 48. The saw is also capable of cutting a negative 1 bevel. This is accomplished by depressing 2 rubberized tabs below the motor housing while the bevel setting knobs are loose. The saw will tilt beyond 90° and sit on 2 set screws that are accessible from the bottom of the base plate.
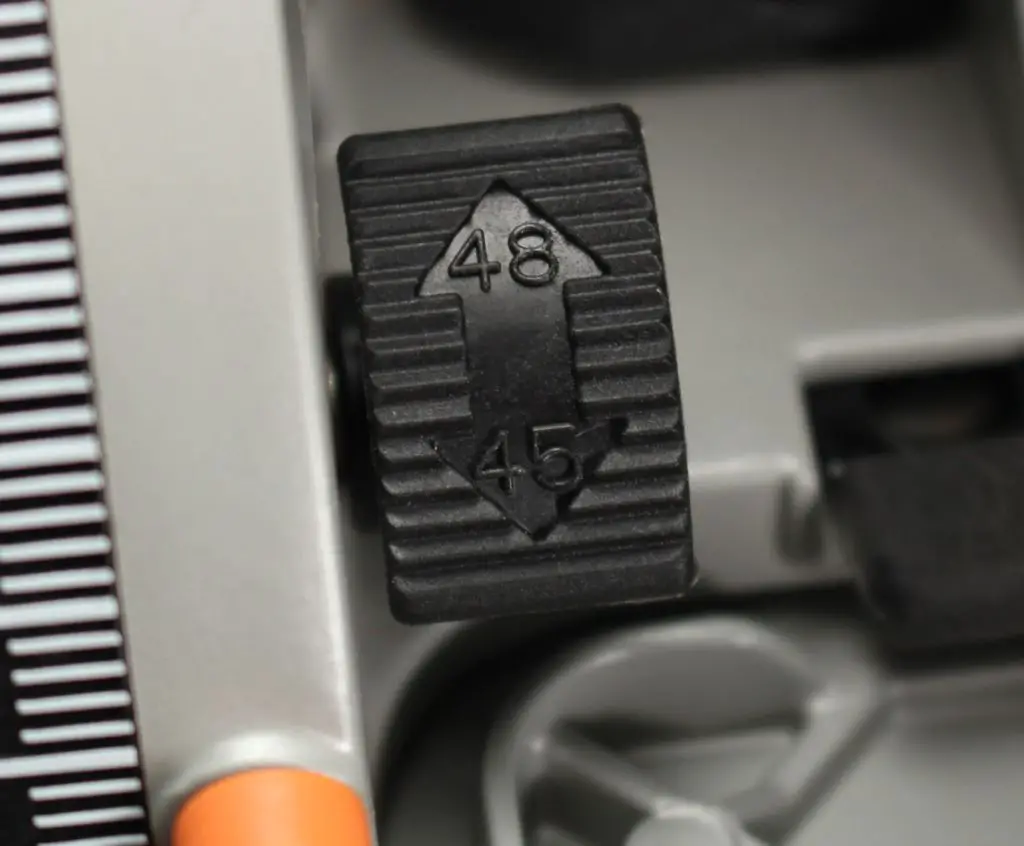
48° Override Lever
Bevel Stop Adjustment
These set screw are also the screws used to adjust the saw to 90°. The manual only indicated one screw but there are clearly two screws required to adjust the saw to 90°. In order to adjust the 45° stop there is a separate set screw around the corner from the 22.5°/45° selector knob. There is no adjustment for the 22.5° or the -1° presets.
As mentioned previously, when cutting a bevel beyond ~30° degrees it is important to use the little slider tab that locks the base plate to the track. I also recommend clamping the track securely to the work piece. If the saw tilts or the track lifts it will ruin the cut.
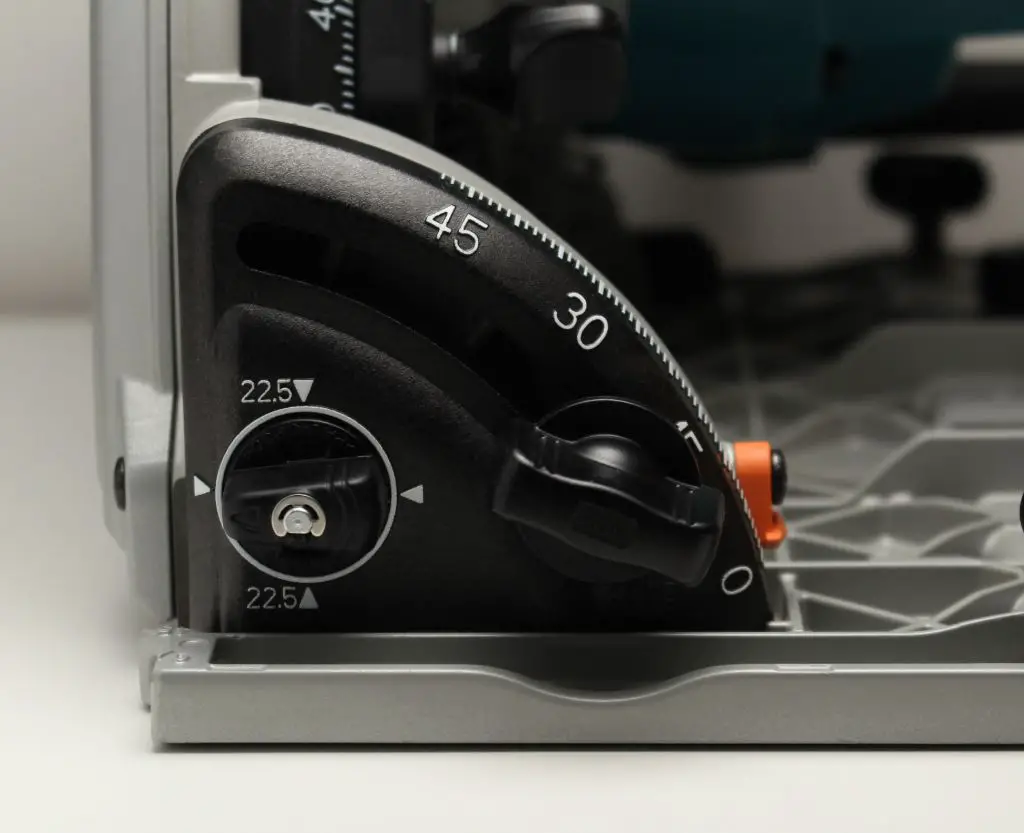
Bevel Cutting Scale Adjustment
Speed Adjustment
Just below the trigger, there is a red wheel used to adjust the saw blade speed, from 2200 RPM to 6400 RPM. Higher cutting speeds will generally cut faster, but will result in reduced blade life. Some material may be better suited to lower speeds, such as plastics. In addition to the speed control knob, the saw features electronic speed control which will vary the current to the motor to try to maintain blade speed to the desired RPM. Of course if the saw is really laboring through thick, wet wood it may not be able to keep up.
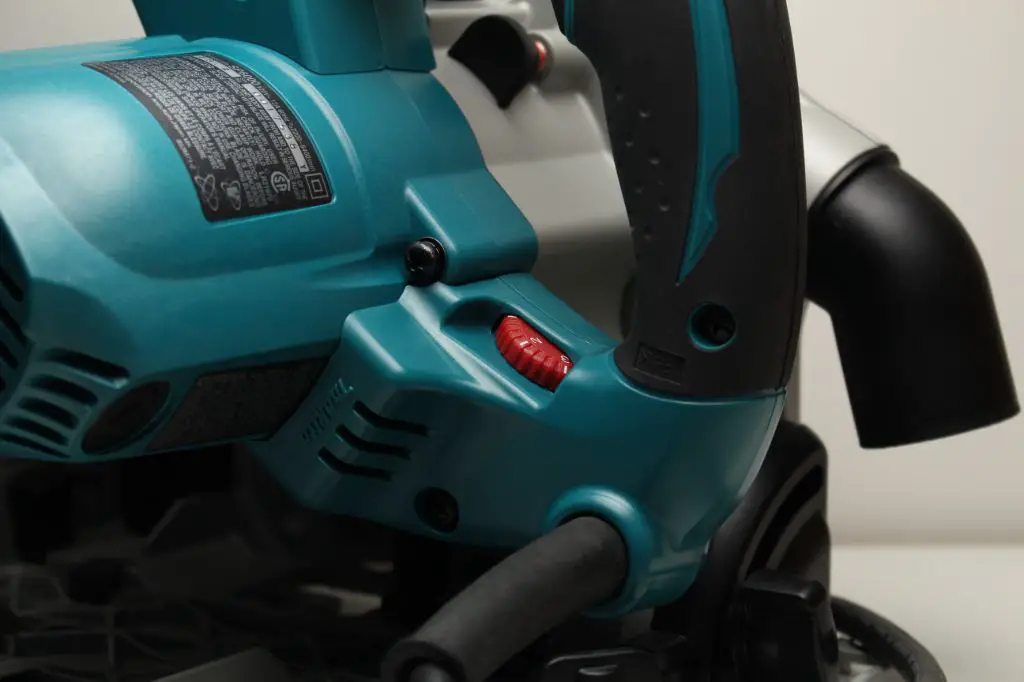
Speed Adjustment Wheel
Track Play Adjustment
On the base plate of the saw there are two knobs that are used to adjust the fit of the base plate to the track slot. This adjustment should be made immediately before the first run of the saw through a fresh track. This first cut trims the zero-clearance edge on the track. The play should be adjusted tight enough so that there is minimal side-to-side play, but loose enough that the saw still travels smoothly along the track.
Cutting
So how does this saw actually perform? I have used the saw on a few different applications, mostly sheet goods. I have also used it to cut counter tops and flooring in place. The first time I tried this saw on some melamine I was blown away by the cut quality. It looked as though the surface had been sanded already.
The other initial impression was how safe and secure it felt to use. I will admit I’ve always had a slight fear of circular saws (especially after meeting a guy who had a bad accident with one), but this tool feels so safe. It is really effortless to push this saw through a cut (yes, it was 3/4″ melamine, not 2″ hardwood, but still). The plunge action makes stopped cuts a breeze.
This saw does lack a riving knife, but if your primary use is breaking down sheet goods then that should not be a concern. If you are ripping freshly milled lumber or hardwood that could have internal stresses built-up then it might be a feature you will miss.
This saw also features soft-start to avoid the initial start-up surge and resulting torque on the saw body.
Track Compatibility
One of the main complaints I have read online about this saw actually relates to the tracks. Either the track arrived damaged, or it wasn’t straight/flat out of the box. I found no issues with my tracks, but I bought mine locally so they didn’t go through the extra shipping and handling. AMAZON LINK
The tracks are available in 39″, 55″ and 118″ lengths. Tracks can be connected using simple connectors to extend as far as desired.
For those concerned about the Makita track, there is good news. The Makita saw is compatible with the festool track. Unfortunately, the Festool track is significantly more expensive, but if you’re have issues with a Makita track then this may be an option worth considering. AMAZON LINK
Dust collection
1-1/2″ OD Dust Collection Port
This saw features a 1.5″ OD dust port which is convenient for connecting the saw to a standard shop vac. With a good shop vac attached the dust collection is decent, but it is far from perfect. Covering the blade-change hole helps, but you will get some dust remaining on the surface no matter what. Now the difference between using the dust collection port and not is still huge. Without a shop vac connected the saw will throw a lot of dust, and a lot of it will be airborne. I think this is where the dust collection is effective – it leaves some dust behind, but it reduces the airborne significantly (especially with the blade-change hole covered).
Blade Change
Makita designed the saw well for accommodating blade changes, although they equipped it with such a nice factory blade that you may not change the blade for some time. The stock blade is a 6-1/2″ (165mm) 48 tooth carbide tipped blade, which produces a very fine cut at these speeds and this blade diameter. There is a depth stop catch built-in to the depth scale that will hold the blade at the correct depth to allow access to the arbor screw. There is also a large spring-loaded button to depress to lock the blade rotation.
Arbor Lock
All in all blade changes are quite easy, if you ever need to do it. I think a more frequent reason to remove the blade would just be to clean the blade itself. Some users have complained that the opening for accessing the arbor screw ejects a lot of dust, even with a shop vac connected. This has resulted in maybe people putting tape over this hole. I have seen some guys on Instagram 3D print little plastic covers that snap in place to cover the hole as well. Some people actually sell them too (LINK HERE).
There is also a hex wrench (Allen Key) incorporated into the handle of the saw so you never have to go searching for the right tool when the time does come to change or service the blade.
Accessories
In order to get the most out of this tool, there are a few accessories to consider.
Tracks
This one is obvious. To use this saw to its potential, you need at least one track. Ideally, you will have 2 or 3. It is really inconvenient to use a long track on a short cut, and of course you can’t use a short track on a long cut. To break down 4′ x 8′ sheet goods, a 118″ track and a 55″ track are ideal. The 39′ track is perfect for wide cross cuts, or trimming up smaller pieces. AMAZON LINK
The tracks can be connected together to extend the possible cut length using simple rail connectors. I have found these easy to use and accurate as long as you have a good straight edge to align the connecting tracks while tightening the connectors. AMAZON LINK
Track Clamps
Makita makes some good clamps that slide into the groove on the underside of the track. Although the track has non-slip strips that keep it secure on most materials, I still like to use clamp when making an important cut. AMAZON LINK
Makita also now offers quick release ratcheting clamps. LINK
Guide Rail Squares
Makita makes a track miter guide that can be adjusted to any angle for making repeat angled cuts. It works reasonably well but my one complaint with this accessory is that it has no pre-set for 90° cuts. If 90° cuts are what you will be doing the most, I would recommend the Insta-RailSquare. It attaches easily to the track and has a wide base to ensure reliable registration to the workpiece.
The final Verdict
After using this saw for about 2 years now I would not hesitate to recommend this saw to anyone. Clearly your decision between corded vs. cordless decision is a personal one, but this saw is a beast in either form.
There is just no replacement for what a track saw can do. Amongst its competitors (Festool, Dewalt, Mafell, Bosch etc..) this saw stands up very well, at a price point that is extremely competitive. This saw compares more closely to the quality of the Festool, at a price much closer to the Dewalt.
Depth and Bevel Adjustment
If you are still mulling the decision whether to buy a track saw or not, please check out my article comparing Table Saw vs. Track Saw for an detailed description of where each tool excels, and the key differences between them.
I hope this helps your purchase decision. Good luck!
Track Saw or Table Saw – The Final Showdown
As an Amazon Associate I earn from qualifying purchases.
Visitor Rating: 4 Stars
Visitor Rating: 4 Stars
Visitor Rating: 5 Stars
Visitor Rating: 3 Stars